Pages

5.29.2011

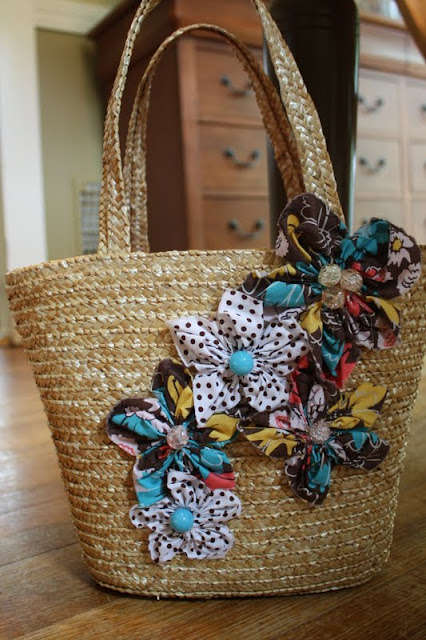
Flower Tote Bag

It's official...I can't think about much else other than this baby coming.  Hence the last week off from Circus Berry.  Now let's be clear, it doesn't mean I have stopped cleaning, baking, crafting, etc.  I think I may have even gone overboard with some of the cleaning as if I was trying to induce labor or something.  I just can't think of what to do with what I have cleaned, baked, crafted...etc...and with my mother being here for the week to help out with 'stuff', my hours were filled with fun Grandma, Mommy, Moira things to do.

I finally decided to share my Flower Tote Bag I whipped up a couple of weeks ago, since I seem to get lots of compliments on it lately.


It was super easy and cost very little to do.

Besides the straw tote from Target's dollar section I used (it cost me $2.50), I gathered some scrap fabrics, random beads, and my hot glue gun, of course.

A tutorial for the flowers can be found here, but any fabric flower should do.

I attached some beads to the center of the flowers, hot-glued, and ended up with a cuter-than-I-ever-realized straw tote for the summer.  Now, don't you want one to coordinate with every outfit???

:)
Anne

UndertheTableandDreaming Keeping It Simple Photobucket  

5.19.2011

More Presents and Tissue Paper Flowers

A couple weeks ago (or was it months?  I can't remember), a good friend had her bridal shower.  I made something special for her, was so excited for her to get it, then I got the stomach flu and didn't get to go to the shower.  Wah, wah.

She finally got her gift last week.

Complete with tissue-paper flowers...

And homemade tag with envelope! (I love these so much I may have to make them again!)

I really wanted to make something for her to give in addition to her registry gift but was stumped for a bit on what to do.  Her and her hubby-to-be are moving after the wedding and I didn't want to get into anything too bulky that would have to be transported.  AND who knows what colors she will be decorating with since they don't know where they are living yet.

I ended up making these simple cloth napkins and reversible place mats.  I was relieved to find out that they would match the dining room in their new apartment nicely.

from Macy's
Her registry had this really pretty green and white vase by Lennox, so paired with that and the cute napkin rings to tie the whole thing together (in addition to the plates, silverware, etc that she will probably get off of her registry), this lady now has a table setting.

It was so simple, and part of me was sad to see it go.  I just love the way it all came together...and that harvest-gold-flowered fabric...*tear*

:)
Anne

Join  us Saturdays at tatertotsandjello.com for the weekend wrap 
 up           party!

5.16.2011

Dining Room Dilemma and a New Center Piece

Of all of the rooms in our house, one rarely gets as cluttered as our dining room.  It is the room that we eat in, that Moira often plays in, and of course, the room that I do all of my crafting in.  And since my crafting never ends, there is an endless trail of crafting supplies hanging out on my dining room table...paper, beads, fabric, glue, sewing machine, thread, etc...Needless to say, the table never really looks much like a dining room table but more like this:


I have been trying to keep my dining room tidy (read: clutter free), but functional (read: able to be used for crafts and play) by not accumulating new things until I have wrapped up some of the started, anticipated, and lists of crafty things that I have accumulated over the winter months.  It is like crafty-nesting.

I have also tried thinking of simple accessories to decorate with that are, let's face it, easy to push aside when I need my work space or when it was time to eat.  (Really, who wants to push aside 6 glass vases and votives and move them back into place every day, several times a day.  I love looking at pictures of beautiful dining rooms, both casual and formal, and the clever, seasonal, pretty center pieces that go in them.  There is just too much going on in ours for something elaborate to work.)


Now, I don't know if it is the highs and lows of pregnancy or living with the same color for 5 years, but I am soooo tired of green.  We are not, however, in a spot to repaint a dining room right now.  Actually, I am not interested in painting.  Although we are not in a spot to buy a new home right now, we are sort of "window shopping" and a baby is on the way, so I can't justify paining a room right now.  I can, however, justify making things a little easier or simpler.

In that spirit, I decided on a something that was a single piece; low; neutral and natural looking to work with our current green and the season; and able to be moved back and forth easily.  Having seen these moss-and-rock-type center pieces online and in magazines, I gave it a go.

Isn't that nice??? (And look!  My table is clear!!!)

Grab a couple of supplies like:

A container (I used a rectangular, flat saucer...found at JoAnn Fabrics), sheet moss, styrofoam to fit your container, some river rocks, hot glue, and your candles/votive holders.

Shave off some of your styrofoam using a serrated knife.  Let's face it, where can you find right angles and perfect rectangles in nature?

Start by hot-gluing some large sheets of sheet moss to your styrofoam.

 Glue on some more moss in random places until you get the "natrual" look you want.

 Place your candles where you want them.  I shaped the moss around the base of the candle holders and pressed them into the styrofoam a little bit so they would stay in place.

Hot-glue some rocks here and there for your finished look.  I have also seen words and phrases written on the rocks before.  Thinking of doing that too...just haven't don it yet!

I also cleaned up the dresser-turned-buffet in our dining room...


And fixed up a nice little vase...

Using some rolled paper flowers...

And hot gluing them onto some branches.

A side note--my dining room table is currently (sort-of) clean with just a small pile of bead containers and  small boxes of thread and buttons at the end of the table.  Not tooooo bad, right?

:)
Anne

UndertheTableandDreaming  craft  Photobucket Keeping It Simple  

5.13.2011

One Fine Chocolate Chip Cookie

Cookies are one of the top items on my list of favorite treats...right after ice cream.  And what can possibly be more delightful than an exceptional chocolate chip cookie?  The answer is, not much.


Recently I stumbled across the New York Times Chocolate Chip Cookies over at My Baking Addiction.  I have tried a couple of chocolate chip cookie recipes before, all yummy but none exactly what I was looking for.  They mostly turned out crunchy...

Now let's be clear...I personally love crunchy cookies.  They are perfect for dipping; however, the Mr. prefers chewy cookies and I do like a chewy cookie as well (there is rarely a cookie I meet that I don't like).  The description of these NY Times cookies were that they were big, dense, and...you got it...chewy.


As if that wasn't enough, I peeked through the recipe and was really excited to see the addition of sea salt before baking.  I grew up in Central NY state where you can find Freihofer's products-a-plenty, including their bite-sized, wonderfully chewy-with-a-slightly-salty flavor, Chocolate Chip Cookies.  They are just great.  That's all I can say.

So, a cookie that was chewy and possibly had a subtle salty flavor?  I had to see for myself.

Do I really need an excuse to bake cookies?  Apparently.

As written in the recipe, I let my cookie dough chill for at least 24 hours...more like 36 hours...before baking.


I also splurged and used some fancy chocolate chips.

The grand unveiling of these so-called chewy chocolate chip cookies was today.


The consensus?


They were loved.  They are in fact chewy and the bittersweet chocolate and the sea salt...I am speechless.  As the Mr. said, "bet you can't eat just one".  (Moira can...she still has not finished the one cookie I gave her this afternoon.  A nibble here, a nibble there.  Now, if only I could make a cookie last as long as she does...)

I even shared.  Some were brought over to my in-laws' this evening.  Some are in the freezer for when Mom comes to town in a couple of weeks.  The rest...

well...


I'll have to get back to you on that...

:)
Anne

5.10.2011

A Coupla Shirt Refashions

I am getting into the home-stretch and running out of clothes to wear.

Home-stretch...that just rang funny to me, since I have 5 weeks to go until baby is due to arrive and my belly keeps stretching...and since my shirt refashions involve some nice, stretchy, long and lean tank tops from Target.

Love them...they cover my belly, I can wear them post-pregnancy, and they aren't as expensive as maternity wear, especially when you get them from the clearance section for a whopping 2 dollars each.


These were super easy to make, each one requiring 2 shirts that match.


Cut the bottom of one shirt into strips.  I cut the bottom hem off plus 3 strips.  (And I have a lot of the top left over after cutting...will do something with that another day.)


Create your crazy design, pin, and sew with a zig-zag stitch.


I really did make a sort of random design here...one strip twisted, folded, and turned for each side, plus one strip turned into a bow and sewn somewhere near the middle.

The second shirt was a little more "organized".  Cut the bottom hem and then 3 strips off the bottom again.  I made the strips thicker this time.


Create pleats, pin, and sew with a zig-zag stitch.


Add a little fancy flower.  I made this one by gathering a piece of the third strip of fabric, sewing the ends together to make a flower, tying a piece of the bottom hem I cut off into a knot, and stitching it to the middle.


Good thing you don't really need to be long and "lean" to wear these...they fit my growing baby bump just fine!

:)
Anne


Today's Creative Blog