Pages

7.01.2011

Grilled Pizza

If there is one thing I learned about cooking dinner when nursing a newborn and potty training a toddler, it is don't do it!  At least don't try to attempt anything more than throwing a hot dog on the grill and some baked beans in a pan...which is great in the summer...just not every night for dinner...

However, with a new grill, warm weather, and a longing to be back to my culinary playtime, I just couldn't resist giving the whole meal preparation thing a shot.

Last night's meal:


Grilled Pizza

I checked out some tips online for grilling pizza.  I am not going to lie, I was really nervous.  I could just envision the pizza dough falling through the grates and baking itself onto the burners of Steve's brand spankin' new grill.  With the help of  this little tutorial on YouTube that I (mostly) followed, pizza on the grill was a breeze.

I topped the pizza dough with a balsamic-olive oil-garlic concoction, blue cheese, caramelized red onion, steak, "pizza" cheese (in that order), and when finished topped with some arugula and grated Parmesan cheese.


Doesn't it look yummy?

The husband loved it...I loved it...Moira loved what she ate of it before she got in trouble.  There were no left-overs.

A couple of tips...
-Have all of your ingredients ready to go and a clear work space near your grill.  I took the dough off the grill, quickly assembled, and returned back to the grill.  It worked very well.
-Split one whole pizza dough in two.  This made it easier to handle.
-Make sure you flour (or use cornmeal) your parchment/wax paper when stretching your dough.  Otherwise it will stick when you flip it over onto the grill and then your are risking burning your fingers as you try to pull dough off of paper.
-Get a pizza peel.  We don't have one.  It is on my wish-list.  It would make my life easier and I won't come dangerously close to frying my digits every time I take dough off of the grill.  If you don't have a peel, tongs work...but watch those fingers!

No more 500 degree kitchen in July when I'm in the mood for pizza!

Next on the grilled pizza menu:
Prosciutto and fig.  A local restaurant serves it and I don't think I ever go there and not order it.

:)
Anne

Weekend Bloggy Reading

6.21.2011

It's A Boy

And now presenting:

Ronan Michael

Our little man was born at 2:21 am, June 11, 2011; 7 pounds, 15 ounces; 20 3/4 inches long.

Just look at how much Momma adores him already!

I started labor early Friday morning, and after a lot of walking, waiting, counting, waiting, visiting with everyone else who had come to wait, sunshine, counting, visits to the playground with Moira, eating, waiting, counting...we headed to the hospital to arrive at 1:32 am and find out that I was 7 cm dilated.  Guess I should have taken some of the "waiting" out of my day!  Less than an hour later we finally got our little surprise...a baby boy--healthy, beautiful, and in the words of Mary Poppins, "practically perfect in every way."


It took a couple of days and a couple of classic, quotable moments ("He stays at the hospital", "No, I do not like him", "I have my own baby"), but by the time we got home from the hospital, Ronan's big sister was smitten.


Moira says things like, "He is delicate", "I wanna kiss his head", and "He is so tiny".

She also soothes him when he cries--"It's okay buddy"; does "This Little Piggy" on his toes; and repeats his name over and over again.

And she has started to take care of her own baby-dolls like Mommy and Daddy take care of Ronan...


Complete with baby and apron...such a little Donna Reed!


 He is a joy.  We all love him so very much.  It is amazing how much worry I had all during my pregnancy about finding the love and energy to care for another baby the way I do Moira, and now that he is here it all just comes naturally.  We are so blessed!

:)
Anne


6.04.2011

Fun with Onsies

Monday I will be 39 weeks and once again, I have much baby on the brain.  I am even dreaming about giving birth...or falling asleep during labor and waking up to a new baby.  Could that ever even happen?  It did in my dream last night!  Needless to say, I am ready.  Come on baby!  Let's go!!!

For the second time, Steve and I don't know if we are having a boy or a girl.  It is all very exciting.  The mystery, the wonder, the predictions you hear from complete strangers and the reasons behind it--you're carrying low, you're carrying up front, you had heartburn, you had morning sickness, you have nice hair, you aren't breaking out, you crave chocolate, you don't eat your vegetables, you blah, blah, blah...

The downside?  You have to have all "gender neutral" things.  No bruiser blue or princess pink here.  That will all come after.  In the meantime, we have to rely on the yellows and greens that retailers offer.  OR...

make our own fun baby onsies...


which I did...


With some colored felt and no-sew Heat n' Bond ironed together...


I traced some fun pictures...


Cut them out...


Ironed them on...


And finished some with Sharpie.

We are even prepared to be festive for Independence Day!


And what is a baseball season without...


You bet!

Even though it feels like the end is not nearly near enough, soon we will meet this baby and see if there has been a little man or lady pummeling me these past months.  The rest of me is ready to get this show on the road so, again, I can enjoy:

  • A Sahlen's hot dog (I love these Buffalo-made hot dogs and my last one was in October);
  • A full cup of coffee (I end up dumping everything after the first 2 sips down the drain because it just doesn't do it for me);
  • A turkey sub (or any other deli meat...another thing taken for granted when you can eat it whenever you want);
  • Sushi (love my raw fish);
  • An ice cold beer (probably a Sam Adams Summer Ale, with my husband, on my back deck on a nice hot day);
  • A 5 mile run (I think I may already have my next half-marathon picked out...ichin' to get back in those running shoes);
  • Touching my toes (goes along with running, I can't wait to be able to stretch and bend like the good ol' days).
:)
Anne

Weekend Bloggy Reading

5.29.2011

Flower Tote Bag

It's official...I can't think about much else other than this baby coming.  Hence the last week off from Circus Berry.  Now let's be clear, it doesn't mean I have stopped cleaning, baking, crafting, etc.  I think I may have even gone overboard with some of the cleaning as if I was trying to induce labor or something.  I just can't think of what to do with what I have cleaned, baked, crafted...etc...and with my mother being here for the week to help out with 'stuff', my hours were filled with fun Grandma, Mommy, Moira things to do.

I finally decided to share my Flower Tote Bag I whipped up a couple of weeks ago, since I seem to get lots of compliments on it lately.


It was super easy and cost very little to do.

Besides the straw tote from Target's dollar section I used (it cost me $2.50), I gathered some scrap fabrics, random beads, and my hot glue gun, of course.

A tutorial for the flowers can be found here, but any fabric flower should do.

I attached some beads to the center of the flowers, hot-glued, and ended up with a cuter-than-I-ever-realized straw tote for the summer.  Now, don't you want one to coordinate with every outfit???

:)
Anne

UndertheTableandDreaming Keeping It Simple Photobucket  

5.19.2011

More Presents and Tissue Paper Flowers

A couple weeks ago (or was it months?  I can't remember), a good friend had her bridal shower.  I made something special for her, was so excited for her to get it, then I got the stomach flu and didn't get to go to the shower.  Wah, wah.

She finally got her gift last week.

Complete with tissue-paper flowers...

And homemade tag with envelope! (I love these so much I may have to make them again!)

I really wanted to make something for her to give in addition to her registry gift but was stumped for a bit on what to do.  Her and her hubby-to-be are moving after the wedding and I didn't want to get into anything too bulky that would have to be transported.  AND who knows what colors she will be decorating with since they don't know where they are living yet.

I ended up making these simple cloth napkins and reversible place mats.  I was relieved to find out that they would match the dining room in their new apartment nicely.

from Macy's
Her registry had this really pretty green and white vase by Lennox, so paired with that and the cute napkin rings to tie the whole thing together (in addition to the plates, silverware, etc that she will probably get off of her registry), this lady now has a table setting.

It was so simple, and part of me was sad to see it go.  I just love the way it all came together...and that harvest-gold-flowered fabric...*tear*

:)
Anne

Join  us Saturdays at tatertotsandjello.com for the weekend wrap 
 up           party!

5.16.2011

Dining Room Dilemma and a New Center Piece

Of all of the rooms in our house, one rarely gets as cluttered as our dining room.  It is the room that we eat in, that Moira often plays in, and of course, the room that I do all of my crafting in.  And since my crafting never ends, there is an endless trail of crafting supplies hanging out on my dining room table...paper, beads, fabric, glue, sewing machine, thread, etc...Needless to say, the table never really looks much like a dining room table but more like this:


I have been trying to keep my dining room tidy (read: clutter free), but functional (read: able to be used for crafts and play) by not accumulating new things until I have wrapped up some of the started, anticipated, and lists of crafty things that I have accumulated over the winter months.  It is like crafty-nesting.

I have also tried thinking of simple accessories to decorate with that are, let's face it, easy to push aside when I need my work space or when it was time to eat.  (Really, who wants to push aside 6 glass vases and votives and move them back into place every day, several times a day.  I love looking at pictures of beautiful dining rooms, both casual and formal, and the clever, seasonal, pretty center pieces that go in them.  There is just too much going on in ours for something elaborate to work.)


Now, I don't know if it is the highs and lows of pregnancy or living with the same color for 5 years, but I am soooo tired of green.  We are not, however, in a spot to repaint a dining room right now.  Actually, I am not interested in painting.  Although we are not in a spot to buy a new home right now, we are sort of "window shopping" and a baby is on the way, so I can't justify paining a room right now.  I can, however, justify making things a little easier or simpler.

In that spirit, I decided on a something that was a single piece; low; neutral and natural looking to work with our current green and the season; and able to be moved back and forth easily.  Having seen these moss-and-rock-type center pieces online and in magazines, I gave it a go.

Isn't that nice??? (And look!  My table is clear!!!)

Grab a couple of supplies like:

A container (I used a rectangular, flat saucer...found at JoAnn Fabrics), sheet moss, styrofoam to fit your container, some river rocks, hot glue, and your candles/votive holders.

Shave off some of your styrofoam using a serrated knife.  Let's face it, where can you find right angles and perfect rectangles in nature?

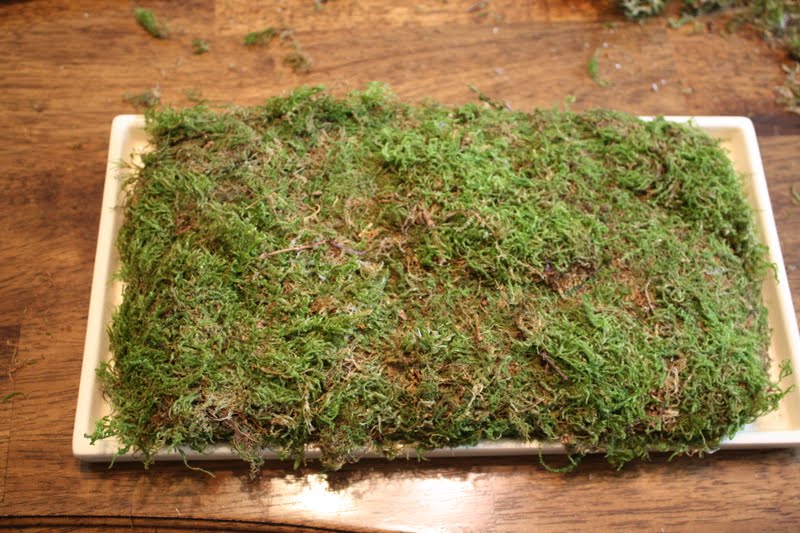
Start by hot-gluing some large sheets of sheet moss to your styrofoam.

 Glue on some more moss in random places until you get the "natrual" look you want.

 Place your candles where you want them.  I shaped the moss around the base of the candle holders and pressed them into the styrofoam a little bit so they would stay in place.

Hot-glue some rocks here and there for your finished look.  I have also seen words and phrases written on the rocks before.  Thinking of doing that too...just haven't don it yet!

I also cleaned up the dresser-turned-buffet in our dining room...


And fixed up a nice little vase...

Using some rolled paper flowers...

And hot gluing them onto some branches.

A side note--my dining room table is currently (sort-of) clean with just a small pile of bead containers and  small boxes of thread and buttons at the end of the table.  Not tooooo bad, right?

:)
Anne

UndertheTableandDreaming  craft  Photobucket Keeping It Simple