Pages

4.07.2011

Recovery Week and Silly Hat Day

Being sick is the pits.  After weeks of thinking I was safe from the stomach flu Moira had over a month ago, it hit me...early Sunday morning.  What a bummer.  I missed my dear friend's bridal shower, my hubby left for business on Monday leaving me the only caregiver (and he got the bug Monday afternoon while away for work...double bummer), and something-that-feels-like-morning-sickness has resurfaced.  I am hoping that last part is just the recovery from the nastiness I experienced Sunday and doesn't actually last the next 10 weeks!

Needless to say, I did not do NEARLY as much as I wanted to do this week.  But funny how a visit from an appraiser to your home will whip your sick butt into gear (thank goodness I didn't have too much cleaning/tidying to do).  And funny how being sick will make you open all of your windows in your house everyday to "get the sickness out", even when it is 34 degrees outside.  I love fresh air!

Here are some other things I DID do:

Had a dinner-date at Panera with Moira.  She was such a good girl...


Started some refashioning of old clothes that were slotted for Goodwill.  Stay tuned to see what I do with THIS...


Made (or I could say assembled) a silly hat for Silly Hat Day today at daycare.  She is so proud of this hat (although, it was like pulling teeth to let me get a picture of her in the hat).


Now, my house is (mostly) clean and my day is open.  I don't even know where to begin...

:)
Anne

4.01.2011

Baby Girl Skirt

I am in love with little girl clothes...and I am not necessarily talking about lace and frills.  I am just talking about all of the possibilities to take something simple and make something oh-so-cute.  Maybe it means I am having a girl.  Maybe it is because I already have a little girl (and she loves her little girl clothes...every time I dress her she wants to show Daddy her "bootiful outfit").  Whatever it is, this is my latest creation for my girlfriend Julie's little baby girl, complete with the how-to.


For an infant skirt, you will need:
  • Main fabric that will be the skirt, 1/2 yard should do it
  • Trim for skirt bottom, about 45" long (I used the bottom of a knit shirt I plan on re-purposing and it was less than 45".  You want to be able to gather it a bit...)
  • 10 inch piece of 1/2" elastic
  • Buttons, beads or other embellishments
  • Sewing machine, matching thread, etc...
1.  Cut the main fabric into 2 pieces, 6 1/2" x 15 each or one piece 6 1/2" x 30...or so (exact science, right?).  With right sides together, sew a seam down the short side(s) of your fabric, to make a tube.  Press in 1/4" inch around the top, then press in another 3/4" inch around the top to make what will be the casing for the elastic.  Press up 1/2" along the bottom to make the hem.

2.  Measure and cut the trim (I started with 1 1/2" off the bottom of the knit fabric but ended up cutting off another 1/2" because I liked the raw edge and wanted a little less length at the bottom.)  Cut a couple of additional strips bottom, about 1 inch wide, for the flowers.

3.  Baste one edge of the knit (trim) about 1/4" from the edge.  Pull the bobbin thread to gather.

4.  Adjust the gather and pin the right side of the knit to the wrong side of the main fabric bottom, lining up the top of the knit edge to the top of the main fabric's hem.

5.  Stitch 1/2" in from the top edge to make the casing for your elastic, leaving a gap to feed the elastic through.  Stitch the trim to the bottom edge.

6.  Make the knit flower rosettes.  I just took my strip of knit, gather and folded toward the center, and stitched through the middle periodically to secure the gathers.

7.  Add the buttons (or other embellishment) to the center of the flowers.  Hand-stitch the flowers to the skirt.

8.  Feed the elastic through the casing.  Overlap the ends of the elastic together slightly and stitch a couple of times across.  Sew your casing shut.  Too cute!

 As you can see, there is a headband to match...of course!  Super easy, super quick....


Cut a strip of fabric, fold wrong sides together and stitch along long, raw edge using a basting stitch.


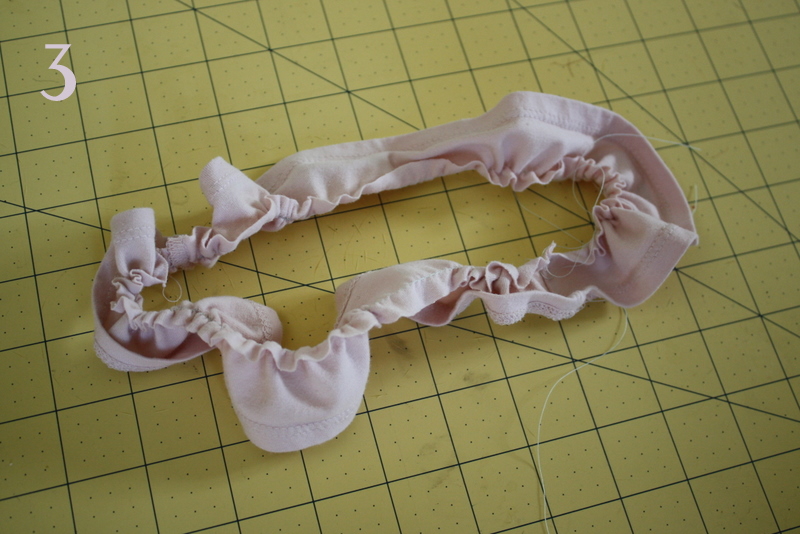
Gather.


Roll the fabric and stitch in the center to make a large flower.


Put one of the knit rosettes in the center, add the button (or other embellishment) and stitch.


Cut a piece of elastic 13 inches long.  Overlap and stitch the ends together several times to secure.  Hand stitch the flower over the elastic stitching.  Told ya it was easy!

Of course we need a pretty package to finish it off.  You will be seeing this kind of massive tissue flower on more presents to come!  It is just too fun not to use again and again.  Get your tissue paper ready...


:)
Anne


3.29.2011

Spring De-Cluttering

Whether it be cooking weeknight meals or baking to fulfill my sweet tooth, I enjoy both trying out new recipes with new ingredients and returning back to those old favorites I will suddenly get a craving for (he-llo Hershey's Special Chocolate Cake).  If you are a Betty-Crocker wannabe like me, your pantry/cupboards are full of wonderful things to include in your recipes...and they are all in bags with some sort of twisty, clampy closure thingy...and they are all shoved into a corner of your pantry...and they may be a bit older than you would like to admit publicly.  Every time I open my cupboard I think to myself, "Geez, Anne, clean this out!"  Well today I got a start on it...

I have been following Simple Mom for a couple of months now because I like her ideas on simplifying and organizing life.  The past couple of weeks she has been presenting a new "Project: Simplify Hot-Spot" for her followers to tackle in their homes--cleaning, organizing, simplifying, decluttering, stuff like that.  This week's spot is the refrigerator/pantry. ( I am proud to say I cleaned my fridge out yesterday.)  Today I began tackling the the baking side of my cupboard.  I really loved how Simple Mom used recycled glass jars to store dry goods...goodbye bags with twisty, clampy things.  And since I just cleaned out my fridge, I had plenty to start with.  I printed some address-sized labels from Giver's Log, slapped those on my jars, and I am now one more step to being less cluttered (and I am reusing too!)


And when you clean out your baking supplies, what do you wanna do?  Bake!  I had some (not expired) ingredients in a bag here, a container there that I thought of using up to free some cupboard space and ended up making a much-altered-version of an old family favorite...Jumbo Golden Raisin Cookies.  But wait!  I don't have golden raisins, nor do I have walnuts...I have dried cherries, apricots, cashews, and honey roasted peanuts...oh, and some flaked coconut.  It will have to do!


The result was a chewy, large, breakfast cookie-type treat.  Mild flavor, hearty, and oh-so-yummy.  I really enjoyed them with my impulse (note: pregnancy) buy at Wegman's today--vanilla flavored almond milk.  mmmm...


 This is the recipe for Jumbo Fruit & Nut Cookies:
1.  Put 1/2 cup dried cherries and 1/2 cup dried chopped apricots in a small bowl.  Add enough boiling water to cover, and let them sit about 10 minutes.  Drain, then added a cup of flaked coconut
2.  Cream 1 cup butter, 1 cup white sugar, and 1 cup packed light brown sugar in a large bowl.
3.  Add 3 eggs, one at a time and beat well.
4.  Add 1 teaspoon vanilla and 1 cup chopped nuts to the fruit mixture (I used 1/2 cup chopped cashews and 1/2 cup chopped honey-roasted peanuts).
5.  Sift together 4 cups flour, 1 teaspoon baking powder, 1 teaspoon baking soda, 1 teaspoon salt, 1/4 teaspoon nutmeg, allspice, and 1 teaspoon cinnamon (I used 2 cups all-purpose and 2 cups whole wheat flour).
6.  Gradually add to butter mixture and blend well.
7.  Stir in fruit/nut mixture.
8.  Drop by spoonfuls onto greased cookie sheet.  Sprinkle sugar on top and bake for 12-15 minutes at 350 (I used my BIG cookie scoop, flattened the cookie slightly, and baked on an ungreased stone for 20 minutes.  If left on stone too long, they will stick a bit).

3.26.2011

Eggs

I dedicate this blog post to Eggs


Right around the time I started my Easter Wreath a couple of weeks ago, I realized that I have plenty of fall decor; I have plenty of Christmas decor (of course); but poor Spring and Easter...I have a bin full of plastic eggs, a couple of baskets, and a cute ceramic bunny I made in a ceramics class with my mother when I was about six or so. I decided to add some more to my collection using what I had, and ended up with my cheap and easy Easter egg vase filler. Once I got started, I loved it so much I had to make a half-a-dozen more. Here is what I did:


I started with my plastic eggs and some twine from the Dollar Tree I had on hand. Starting at one end, I wrapped, glued, wrapped glued the twine around the egg. (I found that using a little hot glue at a time--say, one row--and starting at the skinny end of the egg was easiest and less
messy.)


Then I used some acrylic paint to color my eggs. (Again, I found it best to dab the paint on rather than brush it, but that is just personal preference.) That's it!


In the spirit of the honoring the incredible, edible egg (and after craving them at 3:00 am when I could not fall back asleep after settling a crying 2-year-old), this is what Moira and I had for breakfast.


I have made something like this before, equally as tasty. It is a great way to get some veggies and to use up some of the bunches and bunches of greens I get from our weekly crop share in the summer. Today I used swiss cheese. Other times I have used ricotta cheese. I brushed slices of wheat sourdough with olive oil, grilled them in a pan, topped it with cheese, the greens, and over easy eggs. That's it. So yummy! Now I need to make a sourdough starter so we can begin making our own sourdough bread.

And finally, the last egg-related item. Egg timers.


I would love to think that my two-year-old is a perfect angel, and that she does everything I ask when I ask it of her. But the reality is that she is two, testing, learning, testing, learning, etc. We have been using time-outs as the consequence for not listening to Mommy and Daddy (after about 3 times asking). In an effort to let Moira know when her sentence is up, we are implementing the egg timer. Finally went out and got one today! Now I just need to keep telling myself, "She is two, she is testing and learning, testing and learning."

:)
Anne

craft

3.24.2011

Easter Wreath--DONE!

So, I have gone back and forth about how to decorate my Easter wreath. I really loved the fabric flowers I have seen on across the web, but I had these really great little eggs in my Easter decor stash from JoAnn's (purchased years ago). On the other hand, I really didn't want a WHOLE wreath done up in eggs...hmmm. Well, it did not come to me in a wacky pregnancy dream, but more or less an all-to-frequent sleepless night of staring at the window blinds. Eggs and fabric! Well, sort of...

I used some green tulle remnants I had on hand that I 'just had to have'. I cut strips, gathered (stitching by hand), and made little flowers. After hot gluing them onto the bottom of the wreath, I decided I needed some bright contrast.


I took some green grosgrain ribbon I had and made some little flowers just by making loops and gluing the center. These were added on in some random spots.


Ahhh....now I was ready for the eggs. I hot glued some eggs here, some there (Moira was a great helper during this, handing me a green egg, a blue egg, etc...We are practicing colors).

And here is the finished product.


I knew where I wanted it to go all along...compliments my 'egg tree' nicely, I would say! Easter wreath done!

:)
Anne

3.18.2011

Here I am...


It has been well over a year since my last post and for the past few days I have been thinking of revisiting Circus Berry and seeing what happens. Here I am...
Several of "little gems" have turned up in the past year, some shiny and some not so shiny. Becoming a stay-at-home Mom and crazy home-managing-house-wife is one of those gems that was not so shiny at first (having got into this position because I lost my job), but is fairing well for the time being. Another little gem...baby number 2 on the way, due June 13.

With springtime around the corner and Easter coming up, I really wanted to create something to "spruce up the house with Spring" without the visit to Pier One, Pottery Barn, or even Target. After all, I am trying to get rid of things and limit spending on things that are not necessities (however, the need for Springy-Easter decor is debatable!). Soooo, this is what I am working on now...
I picked up a (scrawny, ugly, wicker) wreath at the Dollar Tree, had some quilt batting and brown yarn on hand, and started my wreath. I cut the batting into strips and wrapped it around the wreath, securing with hot glue. I wrapped the yarn around sort of randomly at first, but intend on making it a little neater as I go. Stay tuned. I am not sure how I will decorate my yarn wreath yet, but I have a feeling it will come to me...maybe in a funky, weird, pregnancy dream!

:)
Anne

1.05.2010

fun with Photoshop Elements 8

Check me out...I downloaded a trial version of Photoshop Elements a couple of days ago and now I'm a junkie....I spent a good portion of this evening playing around until I got myself a nice little blog header. Pretty cute, right?

As if there were NOTHING else in my world to take up my time.

No, really, I should be writing reports right now!